06. CI/CD with GitHub Actions
⏱️ Time: 45 minutes
🏗️ Prerequisites: GitHub repository, Azure subscription, Contributor permissions
Automating your deployment pipeline ensures consistent and reliable releases. This tutorial shows how to use GitHub Actions with OIDC (OpenID Connect) for secure, passwordless authentication.
Infrastructure Context
Service: App Service (Linux, Standard S1) | Network: VNet integrated | VNet: ✅
This tutorial assumes a production-ready App Service deployment with VNet integration, private endpoints for backend services, and managed identity for authentication.
flowchart TD
    INET[Internet] -->|HTTPS| WA["Web App\nApp Service S1\nLinux Node 20 LTS"]

    subgraph VNET["VNet 10.0.0.0/16"]
        subgraph INT_SUB["Integration Subnet 10.0.1.0/24\nDelegation: Microsoft.Web/serverFarms"]
            WA
        end
        subgraph PE_SUB["Private Endpoint Subnet 10.0.2.0/24"]
            PE_KV[PE: Key Vault]
            PE_SQL[PE: Azure SQL]
            PE_ST[PE: Storage]
        end
    end

    PE_KV --> KV[Key Vault]
    PE_SQL --> SQL[Azure SQL]
    PE_ST --> ST[Storage Account]

    subgraph DNS[Private DNS Zones]
        DNS_KV[privatelink.vaultcore.azure.net]
        DNS_SQL[privatelink.database.windows.net]
        DNS_ST[privatelink.blob.core.windows.net]
    end

    PE_KV -.-> DNS_KV
    PE_SQL -.-> DNS_SQL
    PE_ST -.-> DNS_ST

    WA -.->|System-Assigned MI| ENTRA[Microsoft Entra ID]
    WA --> AI[Application Insights]

    style WA fill:#0078d4,color:#fff
    style VNET fill:#E8F5E9,stroke:#4CAF50
    style DNS fill:#E3F2FD
What you'll learn
- How OIDC authentication works with Azure
- Building and packaging a Node.js app in GitHub Actions
- Deploying to a production environment
- Managing staging slots for zero-downtime releases
CI/CD Pipeline Flow
flowchart TD
    subgraph GitHub
        A[Push to main] --> B[Build Job]
        B --> C[Create ZIP]
        C --> D[Upload Artifact]
    end

    subgraph Azure
        D --> E[Download Artifact]
        E --> F[OIDC Login]
        F --> G[Deploy to<br/>App Service]
        G --> H[Health Check]
    end

    H --> I{✅ Success}

    style F fill:#0078d4,color:#fff
    style G fill:#0078d4,color:#fff
1. Setup OIDC Authentication
OIDC eliminates the need for long-lived secrets in GitHub. You'll create a trust relationship between GitHub and Azure.
Create Azure AD App Registration
# Set variables
GITHUB_ORG="your-github-username"
GITHUB_REPO="azure-app-service-practical-guide"
AAD_APP_NAME="github-actions-$GITHUB_REPO"

# Create app registration
CLIENT_ID=$(az ad app create --display-name "$AAD_APP_NAME" --query appId --output json | jq -r '.')
| Command/Code | Purpose |
|---|---|
GITHUB_ORG, GITHUB_REPO, AAD_APP_NAME | Define the GitHub repo and Entra app registration names used for OIDC |
CLIENT_ID=$(az ad app create ... | jq -r '.') | Creates the Entra app registration and stores its application ID |
Create Federated Credential
This tells Azure to trust tokens issued by GitHub for your specific repository and branch.
az ad app federated-credential create \
  --id $CLIENT_ID \
  --parameters '{
    "name": "github-main",
    "issuer": "https://token.actions.githubusercontent.com",
    "subject": "repo:'$GITHUB_ORG'/'$GITHUB_REPO':ref:refs/heads/main",
    "audiences": ["api://AzureADTokenExchange"]
  }' \
  --output json
| Command/Code | Purpose |
|---|---|
az ad app federated-credential create ... | Adds a GitHub OIDC trust configuration to the Entra app |
--id $CLIENT_ID | Targets the app registration created for GitHub Actions |
subject | Restricts token trust to one repository and branch |
audiences | Declares the expected token audience for Azure token exchange |
Grant Azure Permissions
SUBSCRIPTION_ID=$(az account show --query id --output json | jq -r '.')
RG="rg-myapp"

# Create service principal
az ad sp create --id $CLIENT_ID --output json

# Assign Contributor role to the resource group
az role assignment create \
  --assignee $CLIENT_ID \
  --role "Contributor" \
  --scope "/subscriptions/$SUBSCRIPTION_ID/resourceGroups/$RG" \
  --output json
| Command/Code | Purpose |
|---|---|
SUBSCRIPTION_ID=$(az account show ... | jq -r '.') | Captures the current Azure subscription ID |
RG="rg-myapp" | Sets the resource group that the workflow may deploy to |
az ad sp create --id $CLIENT_ID --output json | Creates a service principal for the app registration |
az role assignment create ... --role "Contributor" ... | Grants the service principal Contributor access to the resource group |
2. Configure GitHub Secrets
In your GitHub repository, go to Settings → Secrets and variables → Actions and add: - AZURE_CLIENT_ID: The App ID from step 1. - AZURE_TENANT_ID: Your Azure AD tenant ID (az account show --query tenantId --output json | jq -r '.'). - AZURE_SUBSCRIPTION_ID: Your subscription ID.
Also add a Variable: - APP_NAME: Your App Service name.
3. The Workflow File
This repository does not include an application deployment workflow file for this sample. Use the following GitHub Actions snippet in the workflow you create for your app's build and deploy process:
permissions:
  id-token: write # Required for OIDC
  contents: read

jobs:
  deploy:
    steps:
      - name: Azure Login (OIDC)
        uses: azure/login@v2
        with:
          client-id: ${{ secrets.AZURE_CLIENT_ID }}
          tenant-id: ${{ secrets.AZURE_TENANT_ID }}
          subscription-id: ${{ secrets.AZURE_SUBSCRIPTION_ID }}

      - name: Deploy to Azure App Service
        uses: azure/webapps-deploy@v3
        with:
          app-name: ${{ vars.APP_NAME }}
          package: deploy.zip
Workflow execution summary:
- Azure Login: Exchanges the GitHub OIDC token for an Azure access token.
- Deploy: Uploads the
deploy.zipartifact to App Service and triggers the remote build/restart process.
Example log output from GitHub Actions:
Logging in to Azure with OIDC...
Done setting up OIDC.
Successfully logged in to Azure.

Starting deployment to app-myapp-abc123...
Package deployment using ZIP Deploy initiated.
Successfully deployed to https://app-myapp-abc123.azurewebsites.net
4. Staging Slots (Optional but Recommended)
For zero-downtime deployments, deploy to a staging slot first, verify it, and then swap to production.
# Create a staging slot
az webapp deployment slot create \
  --name $APP_NAME \
  --resource-group $RG \
  --slot staging \
  --output json
| Command/Code | Purpose |
|---|---|
az webapp deployment slot create ... --slot staging --output json | Creates a staging deployment slot for safer releases |
This repository does not include a slot-deployment workflow example. If you want to use deployment slots, add this pattern to your GitHub Actions deployment workflow:
- Deploy to the staging slot.
- Run health checks against the staging URL.
- Use
az webapp deployment slot swapto move staging to production.
Verification
- Push a change to your
mainbranch. - Monitor the Actions tab in GitHub.
- Once finished, verify the deployment:
| Command/Code | Purpose |
|---|---|
curl -f "https://app-myapp-abc123.azurewebsites.net/health" | Fails if the deployed app does not return a successful health response |
Troubleshooting
- OIDC Connection: If login fails, check that the
subjectin your federated credential exactly matches the repository and branch path. - Node Version: Ensure the
NODE_VERSIONin your workflow matches the one configured on your App Service. - Zip Packaging: If the app fails to start, verify that
server.jsis at the root of the uploaded zip package.
Next Steps
Proceed to 07-custom-domain-ssl.md (Optional) to learn about custom domains and certificates.
Advanced Options
Coming Soon
- Multi-environment pipelines (Dev, Staging, Prod)
- Manual approval gates in GitHub Actions
- Integration with Azure Pipelines (ADO)
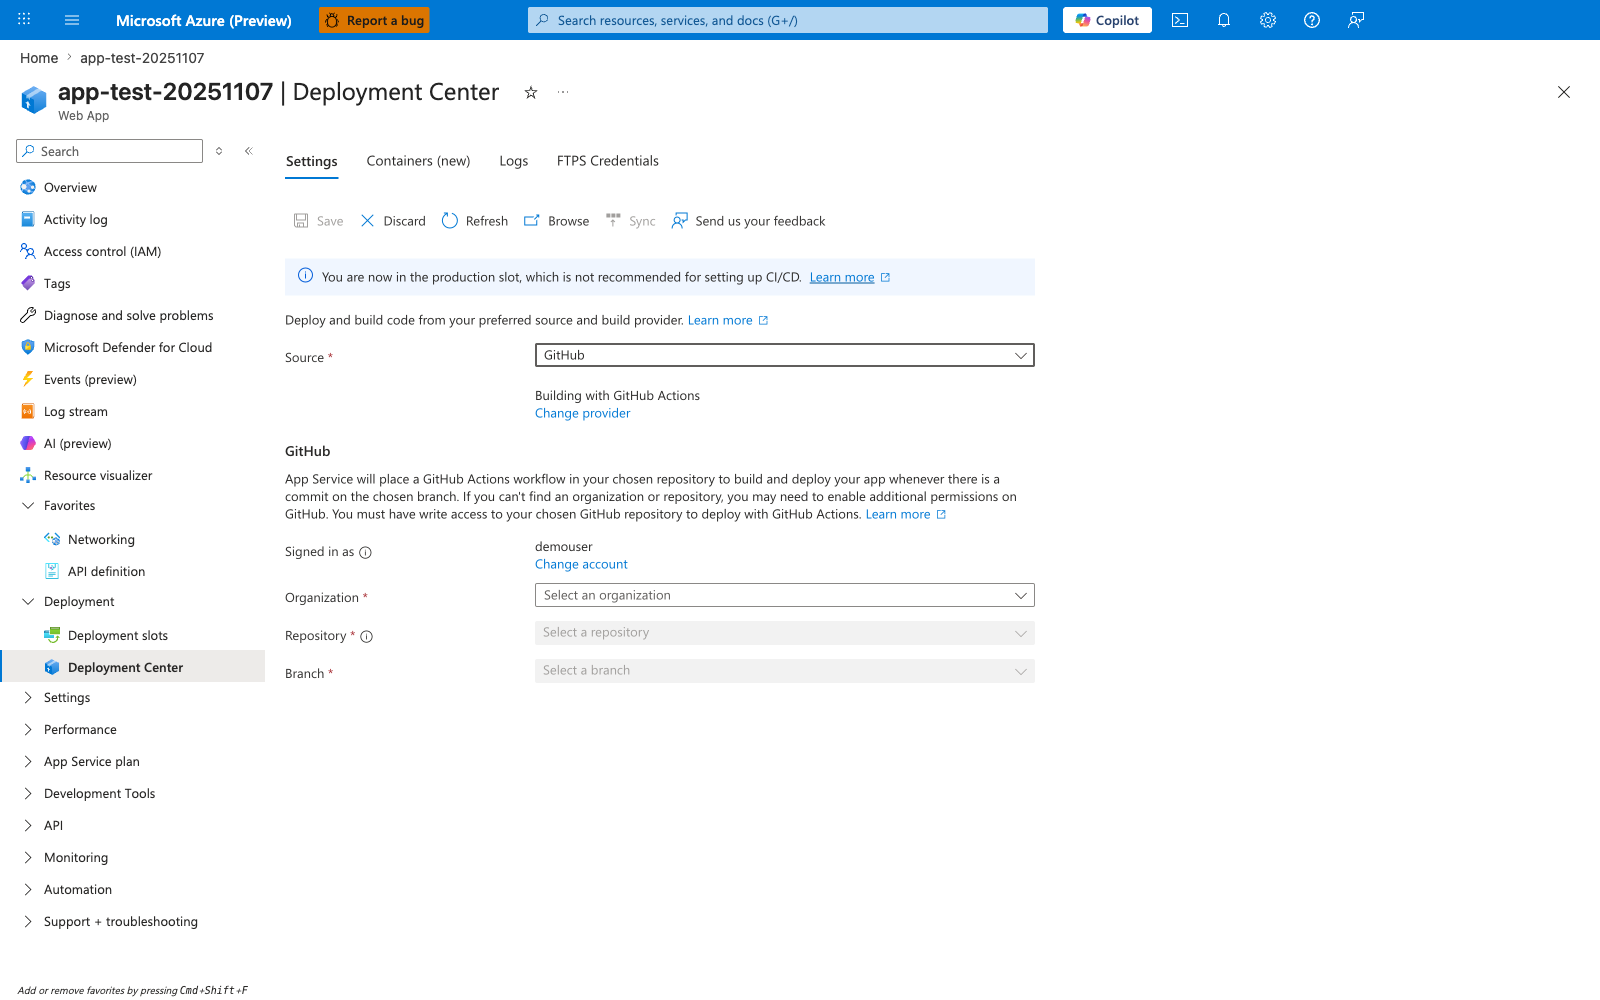
Run It in the Portal
Portal view: Deployment Center blade (GitHub Actions source configuration)
The Deployment Center blade is the Portal entry point for wiring an App Service app to GitHub. With Source: GitHub selected and Building with GitHub Actions, filling in Organization, Repository, and Branch and clicking Save causes App Service to generate a starter workflow in the selected repository. This Node.js tutorial takes the version-controlled path instead by keeping a hand-authored workflow under .github/workflows/ and using explicit azure/login@v2 and azure/webapps-deploy@v3 steps for the Express app deployment. The banner You are now in the production slot, which is not recommended for setting up CI/CD is still useful context when you later harden this flow with staging-slot promotion.