05. Infrastructure as Code with Bicep
⏱️ Time: 30 minutes
🏗️ Prerequisites: Azure CLI, Bicep VS Code extension (optional but recommended)
Manual resource creation in the portal is fine for experiments, but production workloads require Infrastructure as Code (IaC). This tutorial explores how to use Bicep to provision the Node.js hosting environment.
Infrastructure Context
Service: App Service (Linux, Standard S1) | Network: VNet integrated | VNet: ✅
This tutorial assumes a production-ready App Service deployment with VNet integration, private endpoints for backend services, and managed identity for authentication.
flowchart TD
    INET[Internet] -->|HTTPS| WA["Web App\nApp Service S1\nLinux Node 20 LTS"]

    subgraph VNET["VNet 10.0.0.0/16"]
        subgraph INT_SUB["Integration Subnet 10.0.1.0/24\nDelegation: Microsoft.Web/serverFarms"]
            WA
        end
        subgraph PE_SUB["Private Endpoint Subnet 10.0.2.0/24"]
            PE_KV[PE: Key Vault]
            PE_SQL[PE: Azure SQL]
            PE_ST[PE: Storage]
        end
    end

    PE_KV --> KV[Key Vault]
    PE_SQL --> SQL[Azure SQL]
    PE_ST --> ST[Storage Account]

    subgraph DNS[Private DNS Zones]
        DNS_KV[privatelink.vaultcore.azure.net]
        DNS_SQL[privatelink.database.windows.net]
        DNS_ST[privatelink.blob.core.windows.net]
    end

    PE_KV -.-> DNS_KV
    PE_SQL -.-> DNS_SQL
    PE_ST -.-> DNS_ST

    WA -.->|System-Assigned MI| ENTRA[Microsoft Entra ID]
    WA --> AI[Application Insights]

    style WA fill:#0078d4,color:#fff
    style VNET fill:#E8F5E9,stroke:#4CAF50
    style DNS fill:#E3F2FD
What you'll learn
- How Bicep structures App Service resources
- Breaking down
main.bicepand its modules - Managing environment configurations with parameter files
- Deploying resources using the Azure CLI
Architecture
graph TB
    subgraph "Resource Group"
        ASP[App Service Plan<br/>Linux B1]
        APP[App Service<br/>Node.js 20 LTS]
        AI[Application Insights]
        LAW[Log Analytics<br/>Workspace]
    end

    ASP --> APP
    APP -.->|Connection String| AI
    AI --> LAW

    style APP fill:#0078d4,color:#fff
    style AI fill:#ff8c00,color:#fff
    style LAW fill:#107c10,color:#fff
The Infrastructure Layout
The infra/ folder in this repository contains a modular Bicep setup: - main.bicep: The entry point that orchestrates modules. - modules/: Individual resource definitions (App Service, App Insights, etc.). - profiles/: .bicepparam files for different environment sizes.
1. Understanding main.bicep
The main.bicep file defines the core parameters and connects the modules.
// Define common parameters
param location string = resourceGroup().location
param baseName string = 'nodejs-ref'
param appServicePlanSku string = 'B1'

// Orchestrate modules
module appServicePlan 'modules/appservice-plan.bicep' = {
  name: 'appServicePlan'
  params: {
    location: location
    name: 'asp-${baseName}'
    sku: appServicePlanSku
  }
}

module webApp 'modules/webapp.bicep' = {
  name: 'webApp'
  params: {
    location: location
    name: 'app-${baseName}-${uniqueString(resourceGroup().id)}'
    appServicePlanId: appServicePlan.outputs.id
    // ... other settings
  }
}
| Command/Code | Purpose |
|---|---|
param location string = resourceGroup().location | Defaults the deployment region to the current resource group's location |
param baseName string = 'nodejs-ref' | Sets the base naming prefix used across resources |
param appServicePlanSku string = 'B1' | Sets the default App Service plan SKU |
module appServicePlan ... | Deploys the App Service plan module |
module webApp ... | Deploys the web app module and links it to the plan output |
uniqueString(resourceGroup().id) | Generates a globally unique suffix for the web app name |
Key patterns used here: - uniqueString(): Ensures your web app name is globally unique by hashing the resource group ID. - Output passing: The appServicePlanId for the Web App is retrieved from the appServicePlan module output.
2. Using Parameter Files
Instead of passing long strings to the CLI, use .bicepparam files to define environment-specific values. See infra/profiles/minimal.bicepparam:
using '../main.bicep'

param baseName = 'nodesimple'
param appServicePlanSku = 'B1'
param telemetryMode = 'basic'
| Command/Code | Purpose |
|---|---|
using '../main.bicep' | Tells the parameter file which Bicep template it configures |
param baseName = 'nodesimple' | Sets the environment-specific base resource name |
param appServicePlanSku = 'B1' | Overrides the App Service plan size for this profile |
param telemetryMode = 'basic' | Sets the tutorial app's telemetry mode for this deployment |
3. Deployment
Deploy the infrastructure to a resource group. If you don't have a resource group yet, create one first:
# Create a resource group
az group create --name rg-myapp --location eastus --output json

# Deploy using the Bicep file
az deployment group create \
  --resource-group rg-myapp \
  --template-file infra/main.bicep \
  --parameters baseName=myapp appServicePlanSku=B1 \
  --output json
| Command/Code | Purpose |
|---|---|
az group create --name rg-myapp --location eastus --output json | Creates the resource group that will hold the Bicep deployment |
az deployment group create ... --template-file infra/main.bicep ... | Deploys the main Bicep template to the resource group |
baseName=myapp appServicePlanSku=B1 | Supplies inline parameter values for naming and SKU selection |
Or use a parameter file:
az deployment group create \
  --resource-group rg-myapp \
  --template-file infra/main.bicep \
  --parameters infra/profiles/minimal.bicepparam \
  --output json
| Command/Code | Purpose |
|---|---|
az deployment group create ... --parameters infra/profiles/minimal.bicepparam | Deploys the Bicep template using a reusable parameter file |
Verification
After the command completes, verify the resources exist:
- Check CLI output: Look for
"provisioningState": "Succeeded". - List resources:
| Command/Code | Purpose |
|---|---|
az resource list --resource-group $RG --output table | Lists all resources created in the target resource group |
Example output:
Name                    ResourceGroup            Location      Type                               Status
----------------------  -----------------------  ------------  ---------------------------------  --------
plan-<masked>           rg-<masked>              koreacentral  Microsoft.Web/serverFarms
app-<masked>            rg-<masked>              koreacentral  Microsoft.Web/sites
- Get Web App URL:
| Command/Code | Purpose |
|---|---|
az webapp show --name $APP_NAME --resource-group $RG --query defaultHostName --output tsv | Retrieves the default hostname for the deployed web app |
Example output:
- Verify the app is running:
| Command/Code | Purpose |
|---|---|
curl https://$APP_NAME.azurewebsites.net/health | Confirms the deployed app is serving health responses |
**Example output:**
<!-- Verified: real local execution output from node v22.17.0, 2026-05-01 -->
```json
{
  "status": "healthy",
  "timestamp": "2026-05-01T08:33:46.798Z"
}
```

| Command/Code | Purpose |
|--------------|---------|
| `status` | Shows the application reports itself as healthy |
| `timestamp` | Shows when the health check response was generated |
Troubleshooting
- Name Availability: Web app names must be globally unique. If deployment fails with a "Conflict", change your
baseName. - SKU Restrictions: Some regions don't support specific SKUs (like
B1). TryP1V3ifB1is unavailable. - Bicep Version: Ensure you have the latest Bicep CLI by running
az bicep upgrade.
Clean Up
Don't forget to delete resources when done to avoid ongoing charges:
| Command/Code | Purpose |
|---|---|
az group delete --name rg-myapp --yes --no-wait --output json | Starts deleting the tutorial resource group without prompting |
Next Steps
Now that your infrastructure is ready, proceed to 06-ci-cd.md to automate your application deployments.
Advanced Options
Coming Soon
- Terraform for multi-cloud deployments
- Azure Developer CLI (azd) integration
CLI Alternative (No Bicep)
Use these commands when you need an imperative deployment path without changing the existing Bicep workflow.
Step 1: Set variables
RG="rg-express-tutorial"
LOCATION="koreacentral"
PLAN_NAME="plan-express-tutorial-s1"
APP_NAME="app-express-tutorial-abc123"
VNET_NAME="vnet-express-tutorial"
INTEGRATION_SUBNET_NAME="snet-appsvc-integration"
| Command/Code | Purpose |
|---|---|
RG, LOCATION, PLAN_NAME, APP_NAME | Define the core resource names for the CLI deployment path |
VNET_NAME, INTEGRATION_SUBNET_NAME | Define the networking resources for optional VNet integration |
Expected output
Step 2: Create resource group, plan, and app
az group create --name $RG --location $LOCATION
az appservice plan create --resource-group $RG --name $PLAN_NAME --is-linux --sku S1
az webapp create --resource-group $RG --plan $PLAN_NAME --name $APP_NAME --runtime "NODE|20-lts"
| Command/Code | Purpose |
|---|---|
az group create ... | Creates the resource group for the imperative deployment |
az appservice plan create ... | Creates the Linux App Service plan |
az webapp create ... --runtime "NODE\|20-lts" | Creates the Node.js web app |
Expected output
| Command/Code | Purpose |
|---|---|
defaultHostName | Shows the hostname assigned to the new app |
state | Confirms the web app is running |
Step 3: Configure app settings and startup command
az webapp config appsettings set --resource-group $RG --name $APP_NAME --settings SCM_DO_BUILD_DURING_DEPLOYMENT=true NODE_ENV=production
az webapp config set --resource-group $RG --name $APP_NAME --startup-file "node server.js"
| Command/Code | Purpose |
|---|---|
az webapp config appsettings set ... | Enables remote build and sets production mode |
az webapp config set ... --startup-file "node server.js" | Configures the startup command for the app |
Expected output
[
  {
    "name": "SCM_DO_BUILD_DURING_DEPLOYMENT",
    "value": "true"
  },
  {
    "name": "NODE_ENV",
    "value": "production"
  }
]
| Command/Code | Purpose |
|---|---|
SCM_DO_BUILD_DURING_DEPLOYMENT | Enables build automation during deployment |
NODE_ENV | Sets the runtime environment to production |
Step 4 (Optional): Add VNet integration
az network vnet create --resource-group $RG --name $VNET_NAME --location $LOCATION --address-prefixes 10.0.0.0/16
az network vnet subnet create --resource-group $RG --vnet-name $VNET_NAME --name $INTEGRATION_SUBNET_NAME --address-prefixes 10.0.1.0/24 --delegations Microsoft.Web/serverFarms
az webapp vnet-integration add --resource-group $RG --name $APP_NAME --vnet $VNET_NAME --subnet $INTEGRATION_SUBNET_NAME
| Command/Code | Purpose |
|---|---|
az network vnet create ... | Creates the virtual network for the app |
az network vnet subnet create ... --delegations Microsoft.Web/serverFarms | Creates the delegated subnet used for App Service integration |
az webapp vnet-integration add ... | Connects the web app to the integration subnet |
Expected output
{
  "isSwift": true,
  "subnetResourceId": "/subscriptions/<subscription-id>/resourceGroups/rg-express-tutorial/providers/Microsoft.Network/virtualNetworks/vnet-express-tutorial/subnets/snet-appsvc-integration"
}
| Command/Code | Purpose |
|---|---|
isSwift | Confirms regional VNet integration is active |
subnetResourceId | Shows the subnet attached to the app |
Step 5: Validate effective configuration
az webapp config show --resource-group $RG --name $APP_NAME --query "{linuxFxVersion:linuxFxVersion, appCommandLine:appCommandLine}" --output json
az webapp config appsettings list --resource-group $RG --name $APP_NAME --query "[?name=='NODE_ENV' || name=='SCM_DO_BUILD_DURING_DEPLOYMENT']" --output json
| Command/Code | Purpose |
|---|---|
az webapp config show ... | Displays the effective runtime and startup command |
az webapp config appsettings list ... | Confirms key application settings were applied |
Expected output
| Command/Code | Purpose |
|---|---|
linuxFxVersion | Shows the configured Node.js runtime stack |
appCommandLine | Shows the startup command App Service will run |
Run It in the Portal
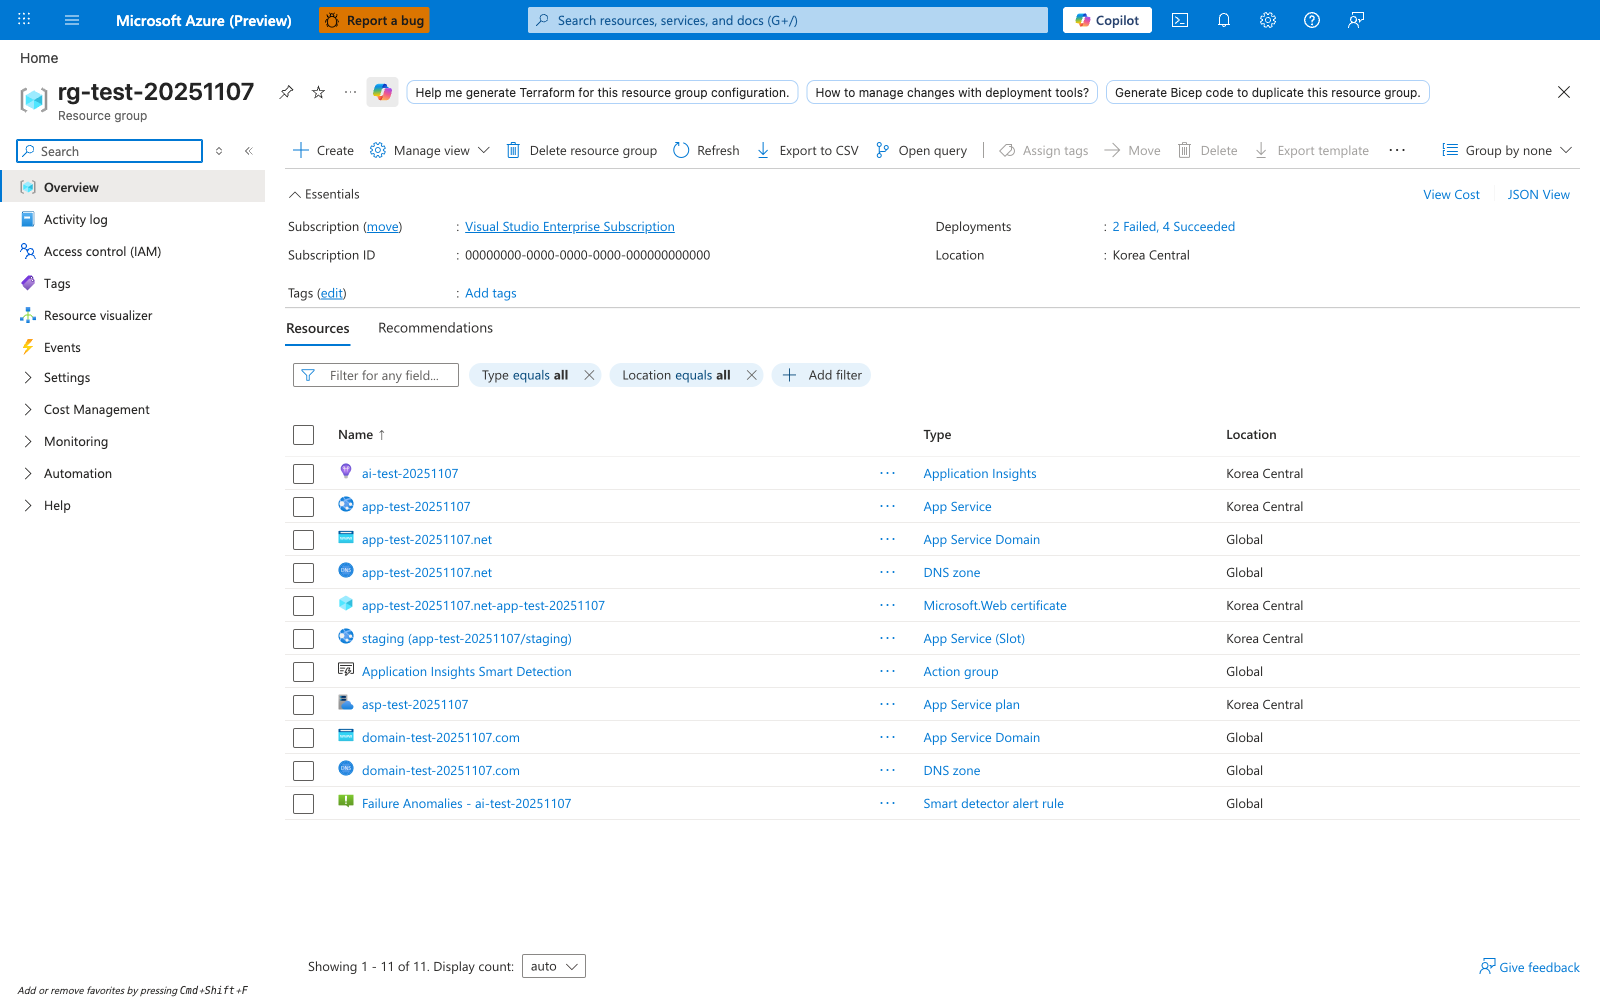
Portal view: Resource group overview (verifying Bicep deployment outputs)
After running az deployment group create --template-file ./infra/main.bicep, the resource group overview is the Portal surface for checking what the deployment produced. The visible Resources tab shows how Azure inventories related resources as separate rows in one resource group, including App Service, App Service Plan, and Application Insights. For this Node.js tutorial, use the same blade to confirm that the web app and plan created by your Bicep deployment exist, then open the Deployments entry in Essentials if you need to inspect deployment history after a partial failure. The Export template button is also useful when you want to compare deployed ARM state with the Bicep source for the Express app's infrastructure.